众所周知,用 Xcode 开发 App Watch 应用只能使用 Interface Builder (以下简称 IB ),甚至于它的 API 中都没有 -(void)init 接口,如下:
1
2
3
4
5
6
7
8
9
10
11
12
13
@interface WKInterfaceButton : WKInterfaceObject
- ( void ) setTitle: ( nullable NSString * ) title ;
- ( void ) setAttributedTitle: ( nullable NSAttributedString * ) attributedTitle ;
- ( void ) setBackgroundColor: ( nullable UIColor * ) color ;
- ( void ) setBackgroundImage: ( nullable UIImage * ) image ;
- ( void ) setBackgroundImageData: ( nullable NSData * ) imageData ;
- ( void ) setBackgroundImageNamed: ( nullable NSString * ) imageName ;
- ( void ) setEnabled: ( BOOL ) enabled ;
@end
另外,在 Xcode 6 之后,新增了一个很强的特性 IBInspectable ,它允许开发者自定义的控件使用 IB 来设置参数。
回顾计算机的发展历程,人类一直在为 WYSIWYG (所见即所得)做着不懈的努力(当然,程序员有时候会逆其道而行之,比如写文档像码代码的 LaTeX Xib 和 StoryBoard 的,而 IBInspectable 的出现更加坚定了继续使用它们的信心,同时也表明的苹果官方的态度,苹果希望开发者们使用 IB 。
接下来就说明一下 IBInspectable 可以为封装控件带来什么新的启发。
IBInspectable IBInspectable 的使用非常简单,首先定义自己的类,然后在定义的上一行添加 IB_DESIGNABLE 宏即可(如果是 Swift ,使用 @IBDesignable)。这里以本人的开源项目 RTIconButton (https://github.com/rickytan/RTIconButton)
1
2
3
4
5
6
7
8
9
10
11
12
13
typedef NS_ENUM ( NSInteger , GSIconPosition ) {
GSIconPositionTop = 0 ,
GSIconPositionLeft ,
GSIconPositionBottom ,
GSIconPositionRight
};
IB_DESIGNABLE
@interface RTIconButton : UIButton
@property ( nonatomic , assign ) IBInspectable CGFloat iconMargin ;
@property ( nonatomic , assign ) IBInspectable NSInteger iconPosition ;
@property ( nonatomic , assign ) IBInspectable CGSize iconSize ; // default is image size;
@end
然后在需要使用 IB 来设置值的属性上添加 IBInspectable 宏。这个并不是什么新的黑科技,事实上它只是告诉了 Xcode 使用 Runtime Attribute 来设置它的值。
所以它支持的属性类型也是有限的,只有以下几种(不支持 UIFont 和 ENUM ,所以本项目中的 iconPosition 使用了 NSInteger),但也基本够用:
Boolean
Number
String
Localized String
Point
Size
Rect
Range
Color
Image
Nil
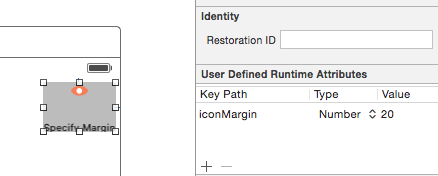
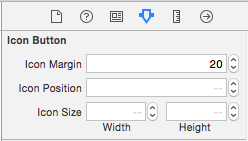
上面的代码中,三个属性都定义为可以使用 IB ,那么当你拖拽一个 UIButton 到界面上,设置它的 Class 为 RTIconButton 后,Xcode 的 Attributes Inspector 面板会多出如下几个可设置的项目:
如果不设置,它将使用默认值,即代码在 -(void)init 时自己设置的值。这里需要注意的是,从 IB 生成的界面调用的是 - (instancetype)initWithCoder:(NSCoder *)aDecoder,所以通常的做法写一个 -(void)commonInit 之类的。
1
2
3
4
5
6
7
8
9
10
11
12
13
14
15
16
17
18
19
20
21
22
- ( void ) commonInit
{
self . iconSize = CGSizeZero ;
}
- ( instancetype ) initWithCoder: ( NSCoder * ) aDecoder
{
self = [ super initWithCoder: aDecoder ];
if ( self ) {
[ self commonInit ];
}
return self ;
}
- ( instancetype ) initWithFrame: ( CGRect ) frame
{
self = [ super initWithFrame: frame ];
if ( self ) {
[ self commonInit ];
}
return self ;
}
intrinsicContentSize其次,为了支持 NSLayoutConstraint ,一定要实现 - (CGSize)intrinsicContentSize 方法,否则在运行时,控件的 size 会发生改变:
1
2
3
4
5
6
7
8
9
10
11
12
13
14
15
16
17
18
19
20
21
22
23
24
25
- ( CGSize ) intrinsicContentSize
{
CGRect contentRect = [ self contentRectForBounds: self . bounds ];
#pragma clang diagnostic push
#pragma clang diagnostic ignored "-Wdeprecated"
CGSize titleSize = [[ self titleForState: self . state ] sizeWithFont: self . font ];
#pragma clang diagnostic pop
CGSize imageSize = CGSizeEqualToSize ( self . iconSize , CGSizeZero ) ? [ super imageRectForContentRect: contentRect ]. size : self . iconSize ;
switch ( _iconPosition ) {
case GSIconPositionTop:
case GSIconPositionBottom:
return CGSizeMake ( MAX ( titleSize . width , imageSize . width ), titleSize . height + imageSize . height + self . iconMargin );
break ;
default :
return CGSizeMake ( titleSize . width + imageSize . width + self . iconMargin , MAX ( titleSize . height , imageSize . height ));
break ;
}
}
- ( CGSize ) sizeThatFits: ( CGSize ) size
{
return [ self intrinsicContentSize ];
}
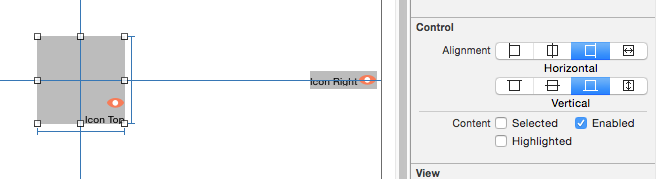
本项目解决了 Icon 与 Title 混排的一些常见需求,支持设置间距、调整 Icon 大小、Icon 位置,及水平和竖直方向对齐,并且所有的设置所见即所得!
所有源代码可以在 https://github.com/rickytan/RTIconButton 上找到。
目前已知问题:
如果设置了 Shows Touch On Highlight (即点上去发白光的那个属性),白光可能不在正中间
这就完了吗?并没有!有些控件需要 Delegate 提供数据源,在真正运行前是看不到样子的怎么办?其实也可以让它们可见,至少来说部分可见。同时,这里以本人的另一个项目 RSlideView
1
2
3
4
5
6
7
8
9
10
11
IB_DESIGNABLE
@interface RSlideView : UIView
// 这里省略了不支持 IB 的属性
@property ( nonatomic , assign , getter = isLoopSlide ) IBInspectable BOOL loopSlide ;
@property ( nonatomic , assign , getter = isContinuousScroll ) IBInspectable BOOL continuousScroll ;
@property ( nonatomic , assign , getter = isPageControlHidden ) IBInspectable BOOL pageControlHidden ; // Default YES
@property ( nonatomic , assign ) IBInspectable UIColor * pageControlBackgroundColor ;
@property ( nonatomic , assign ) IBInspectable CGSize pageSize ; // Default to be the RSlideView's size
// The Gap between two pages, default to be 0
@property ( nonatomic , assign ) IBInspectable CGFloat pageMargin ;
@end
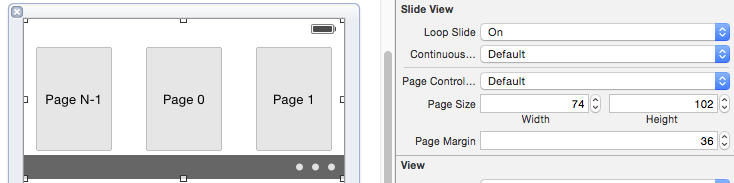
本项目提供一个可以循环滚动的 Banner 控件,但是在运行前没有任何数据可以生成 Banner ,我们可以覆盖 - (void)drawRect:(CGRect)rect 方法将 Banner 的布局样子绘制出来:
1
2
3
4
5
6
7
8
9
10
11
12
13
14
15
16
17
18
19
20
21
22
23
24
25
26
27
28
29
30
31
32
33
34
35
36
37
38
39
40
41
#if TARGET_INTERFACE_BUILDER
- ( void ) drawRect: ( CGRect ) rect
{
// Drawing code
if ( CGSizeEqualToSize ( _pageSize , CGSizeZero )) {
_pageSize = self . bounds . size ;
}
[ self updateVisibalePages ];
CGSize size = CGSizeMake ( _pageSize . width + _pageMargin , _pageSize . height );
CGRect scrollRect = CGRectMake (( CGRectGetWidth ( self . bounds ) - _pageSize . width - _pageMargin ) / 2 ,
( CGRectGetHeight ( self . bounds ) - _pageSize . height ) / 2 ,
self . pageSize . width + _pageMargin , _pageSize . height );
NSDictionary * attri = @ { NSFontAttributeName: [ UIFont systemFontOfSize: 13 ],
NSForegroundColorAttributeName: [ UIColor darkTextColor ]};
NSInteger start = self . loopSlide ? - _extraPagesForLoopShow : 0 ;
for ( NSInteger i = start ; i <= _extraPagesForLoopShow ; ++ i ) {
[[ UIColor grayColor ] setStroke ];
[[ UIColor colorWithWhite: 0.9 alpha: 1.0 ] setFill ];
CGRect rect = CGRectMake ( _pageMargin / 2 + size . width * i ,
( size . height - _pageSize . height ) / 2 ,
_pageSize . width , _pageSize . height );
rect = CGRectOffset ( rect , scrollRect . origin . x , scrollRect . origin . y );
UIBezierPath * path = [ UIBezierPath bezierPathWithRect: rect ];
[ path stroke ];
[ path fill ];
NSString * page = [ NSString stringWithFormat: @"Page %s%ld" , self . loopSlide && i < 0 ? "N" : "" , i ];
CGSize textSize = [ page sizeWithAttributes: attri ];
CGPoint textPoint = CGPointMake ( CGRectGetMidX ( rect ) - textSize . width / 2 , CGRectGetMidY ( rect ) - textSize . height / 2 );
[ page drawAtPoint: textPoint
withAttributes: attri ];
}
self . pageControl . numberOfPages = MIN ( 10 , _extraPagesForLoopShow * 2 + 1 );
self . pageControl . title = @"Page 0" ;
}
#endif
于是得到以下结果,我们没有数据也可以看到有数据后它们应该有的布局了!
你可以调整 pageSize ,pageMargin 等属性,同样所见即所得!
这里需要注意的是,我们并不需要在真正使用这个控件的时候出现绘制的边框,所以代码需要用 TARGET_INTERFACE_BUILDER 宏包起来,告诉编译器,只在使用 IB 时编译这段代码。
结语
所以为什么还不使用 IB 呢?所见即所得不应该成为程序员的终极目标么?赶紧拿出你之前写的代码做一次最佳实践吧!